- Design a Custom Character for an LCD
mikeyancey.com/hamcalc/lcd_characters.php
LCD Custom Character Generator
Design a Custom Character for an LCD First off - this is not my original design. Bruno Maia / Icontexto.com built this originally. It's been a very useful tool, but in recent months, it's disappeared. I thought I'd just make a quickie re-build of it, so I
mikeyancey.com
- HOW TO SETUP AN I2C LCD ON THE RASPBERRY PI
How to Setup an I2C LCD on the Raspberry Pi
How to use I2C to connect an LCD to the Raspberry Pi. Learn how to scroll, position, and clear text, print the date, time, IP address, and sensor data.
www.circuitbasics.com
devicemart.blogspot.com/2019/06/i2c-1602-lcd.html
[흥프로] 라즈베리파이 실습 예제 I2C 1602 LCD 모듈 사용하기
전기/전자부품, 로봇/기계부품, 코딩교육 국내 1위 쇼핑몰 디바이스마트 공식 블로그입니다.
devicemart.blogspot.com
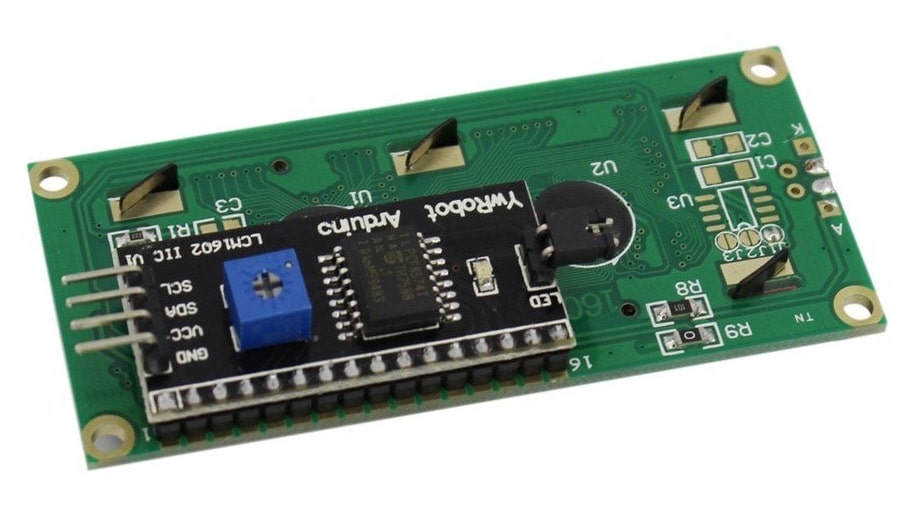
- 가변저항(파란색)으로 lcd 밝기 조절 가능
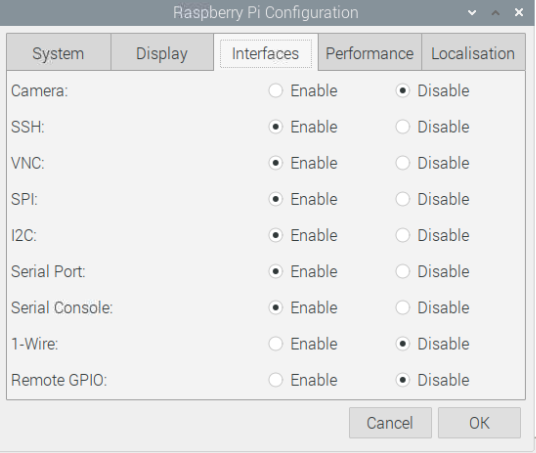
- Preferences->Raspberry Pi Configuration
sudo apt-get install i2c-tools
sudo apt-get install python-smbus
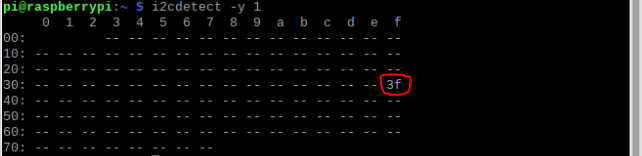
i2cdetect -y 1
- INSTALLING THE LIBRARY
# -*- coding: utf-8 -*-
# Original code found at:
# https://gist.github.com/DenisFromHR/cc863375a6e19dce359d

"""
Compiled, mashed and generally mutilated 2014-2015 by Denis Pleic
Made available under GNU GENERAL PUBLIC LICENSE

# Modified Python I2C library for Raspberry Pi
# as found on http://www.recantha.co.uk/blog/?p=4849
# Joined existing 'i2c_lib.py' and 'lcddriver.py' into a single library
# added bits and pieces from various sources
# By DenisFromHR (Denis Pleic)
# 2015-02-10, ver 0.1

"""

# i2c bus (0 -- original Pi, 1 -- Rev 2 Pi)
I2CBUS = 1

# LCD Address
ADDRESS = 0x3f

import smbus
from time import sleep

class i2c_device:
   def __init__(self, addr, port=I2CBUS):
      self.addr = addr
      self.bus = smbus.SMBus(port)

# Write a single command
   def write_cmd(self, cmd):
      self.bus.write_byte(self.addr, cmd)
      sleep(0.0001)

# Write a command and argument
   def write_cmd_arg(self, cmd, data):
      self.bus.write_byte_data(self.addr, cmd, data)
      sleep(0.0001)

# Write a block of data
   def write_block_data(self, cmd, data):
      self.bus.write_block_data(self.addr, cmd, data)
      sleep(0.0001)

# Read a single byte
   def read(self):
      return self.bus.read_byte(self.addr)

# Read
   def read_data(self, cmd):
      return self.bus.read_byte_data(self.addr, cmd)

# Read a block of data
   def read_block_data(self, cmd):
      return self.bus.read_block_data(self.addr, cmd)


# commands
LCD_CLEARDISPLAY = 0x01
LCD_RETURNHOME = 0x02
LCD_ENTRYMODESET = 0x04
LCD_DISPLAYCONTROL = 0x08
LCD_CURSORSHIFT = 0x10
LCD_FUNCTIONSET = 0x20
LCD_SETCGRAMADDR = 0x40
LCD_SETDDRAMADDR = 0x80

# flags for display entry mode
LCD_ENTRYRIGHT = 0x00
LCD_ENTRYLEFT = 0x02
LCD_ENTRYSHIFTINCREMENT = 0x01
LCD_ENTRYSHIFTDECREMENT = 0x00

# flags for display on/off control
LCD_DISPLAYON = 0x04
LCD_DISPLAYOFF = 0x00
LCD_CURSORON = 0x02
LCD_CURSOROFF = 0x00
LCD_BLINKON = 0x01
LCD_BLINKOFF = 0x00

# flags for display/cursor shift
LCD_DISPLAYMOVE = 0x08
LCD_CURSORMOVE = 0x00
LCD_MOVERIGHT = 0x04
LCD_MOVELEFT = 0x00

# flags for function set
LCD_8BITMODE = 0x10
LCD_4BITMODE = 0x00
LCD_2LINE = 0x08
LCD_1LINE = 0x00
LCD_5x10DOTS = 0x04
LCD_5x8DOTS = 0x00

# flags for backlight control
LCD_BACKLIGHT = 0x08
LCD_NOBACKLIGHT = 0x00

En = 0b00000100 # Enable bit
Rw = 0b00000010 # Read/Write bit
Rs = 0b00000001 # Register select bit

class lcd:
   #initializes objects and lcd
   def __init__(self):
      self.lcd_device = i2c_device(ADDRESS)

      self.lcd_write(0x03)
      self.lcd_write(0x03)
      self.lcd_write(0x03)
      self.lcd_write(0x02)

      self.lcd_write(LCD_FUNCTIONSET | LCD_2LINE | LCD_5x8DOTS | LCD_4BITMODE)
      self.lcd_write(LCD_DISPLAYCONTROL | LCD_DISPLAYON)
      self.lcd_write(LCD_CLEARDISPLAY)
      self.lcd_write(LCD_ENTRYMODESET | LCD_ENTRYLEFT)
      sleep(0.2)


   # clocks EN to latch command
   def lcd_strobe(self, data):
      self.lcd_device.write_cmd(data | En | LCD_BACKLIGHT)
      sleep(.0005)
      self.lcd_device.write_cmd(((data & ~En) | LCD_BACKLIGHT))
      sleep(.0001)

   def lcd_write_four_bits(self, data):
      self.lcd_device.write_cmd(data | LCD_BACKLIGHT)
      self.lcd_strobe(data)

   # write a command to lcd
   def lcd_write(self, cmd, mode=0):
      self.lcd_write_four_bits(mode | (cmd & 0xF0))
      self.lcd_write_four_bits(mode | ((cmd << 4) & 0xF0))

   # write a character to lcd (or character rom) 0x09: backlight | RS=DR<
   # works!
   def lcd_write_char(self, charvalue, mode=1):
      self.lcd_write_four_bits(mode | (charvalue & 0xF0))
      self.lcd_write_four_bits(mode | ((charvalue << 4) & 0xF0))

   # put string function with optional char positioning
   def lcd_display_string(self, string, line=1, pos=0):
    if line == 1:
      pos_new = pos
    elif line == 2:
      pos_new = 0x40 + pos
    elif line == 3:
      pos_new = 0x14 + pos
    elif line == 4:
      pos_new = 0x54 + pos

    self.lcd_write(0x80 + pos_new)

    for char in string:
      self.lcd_write(ord(char), Rs)

   # clear lcd and set to home
   def lcd_clear(self):
      self.lcd_write(LCD_CLEARDISPLAY)
      self.lcd_write(LCD_RETURNHOME)

   # define backlight on/off (lcd.backlight(1); off= lcd.backlight(0)
   def backlight(self, state): # for state, 1 = on, 0 = off
      if state == 1:
         self.lcd_device.write_cmd(LCD_BACKLIGHT)
      elif state == 0:
         self.lcd_device.write_cmd(LCD_NOBACKLIGHT)

   # add custom characters (0 - 7)
   def lcd_load_custom_chars(self, fontdata):
      self.lcd_write(0x40);
      for char in fontdata:
         for line in char:
            self.lcd_write_char(line)
- lcd_text.py 파일 생성
import I2C_LCD_driver
from time import *

mylcd = I2C_LCD_driver.lcd()

mylcd.lcd_display_string("Hello World!", 1)
("Hello World!", 1, 2)로 바꾸면 글자 위치 바뀜 1=>행(1~2) 2=> 위치(1~3)
->lcd에 Hello World! 출력됨
- 날짜/시간 출력
import I2C_LCD_driver
import time
mylcd = I2C_LCD_driver.lcd()


while True:
    mylcd.lcd_display_string("Time: %s" %time.strftime("%H:%M:%S"), 1)

    mylcd.lcd_display_string("Date: %s" %time.strftime("%m/%d/%Y"), 2)
-온습도 센서 + lcd
import RPi.GPIO as GPIO
import time
import Adafruit_DHT
import I2C_LCD_driver
from time import *

sensor = Adafruit_DHT.DHT11
pin = 4


try:
    while True:
        h,t = Adafruit_DHT.read_retry(sensor,pin)
        mylcd = I2C_LCD_driver.lcd()
        if h is not None and t is not None:
            print("Temperate={0:0.1f}*C Humidity={1:0.1f}%".format(t,h))
            mylcd.lcd_display_string("Temperate={0:0.1f}*C".format(t),1)
            mylcd.lcd_display_string("Humidity={0:0.1f}%".format(h),2)
        else:
            print("Read error")


except KeyboardInterrupt:
    print("bye")

finally:
    print("End of Program")
- 온습도 센서+ led추가+ lcd
import RPi.GPIO as GPIO
import time
import Adafruit_DHT
import I2C_LCD_driver
from time import *

GPIO.setmode(GPIO.BCM)

sensor = Adafruit_DHT.DHT11
pin = 4
LED_R= 13
LED_G= 19
LED_B= 26

GPIO.setup(LED_R, GPIO.OUT)
GPIO.setup(LED_G, GPIO.OUT)
GPIO.setup(LED_B, GPIO.OUT)

try:
    while True:
        h,t = Adafruit_DHT.read_retry(sensor,pin)
        mylcd = I2C_LCD_driver.lcd()
        if h is not None and t is not None:
            if t > 27:
             GPIO.output(LED_R, True)
             GPIO.output(LED_G, False)
             GPIO.output(LED_B, False)
             print("Temperate={0:0.1f}*C Humidity={1:0.1f}%".format(t,h))
             mylcd.lcd_display_string("Temperate={0:0.1f}*C".format(t),1)
             mylcd.lcd_display_string("Humidity={0:0.1f}%".format(h),2)

            elif t < 10:
             GPIO.output(LED_R, False)
             GPIO.output(LED_G, False)
             GPIO.output(LED_B, True)
             print("Temperate={0:0.1f}*C Humidity={1:0.1f}%".format(t,h))
             mylcd.lcd_display_string("Temperate={0:0.1f}*C".format(t),1)
             mylcd.lcd_display_string("Humidity={0:0.1f}%".format(h),2)

            elif t >10 and t < 27:
             GPIO.output(LED_R, False)
             GPIO.output(LED_G, True)
             GPIO.output(LED_B, False)
             print("Temperate={0:0.1f}*C Humidity={1:0.1f}%".format(t,h))
             mylcd.lcd_display_string("Temperate={0:0.1f}*C".format(t),1)
             mylcd.lcd_display_string("Humidity={0:0.1f}%".format(h),2)

        else:
            print("Read error")

except KeyboardInterrupt:
    GPIO.output(LED_R, False)
    GPIO.output(LED_G, False)
    GPIO.output(LED_B, False)
    print("bye")
finally:
    print("End of Program")
- 글자 출력
import I2C_LCD_driver
from time import *

mylcd = I2C_LCD_driver.lcd()

fontdata1 = [
        # char(0) - Upper-left character
        [ 0b00000,
          0b00000,
          0b00000,
          0b00000,
          0b00000,
          0b00000,
          0b11111,
          0b11111 ],

        # char(1) - Upper-middle character
        [ 0b00000,
          0b00000,
          0b00100,
          0b00110,
          0b00111,
          0b00111,
          0b11111,
          0b11111 ],

        # char(2) - Upper-right character
        [ 0b00000,
          0b00000,
          0b00000,
          0b00000,
          0b00000,
          0b00000,
          0b10000,
          0b11000 ],

        # char(3) - Lower-left character
        [ 0b11111,
          0b11111,
          0b00000,
          0b00000,
          0b00000,
          0b00000,
          0b00000,
          0b00000 ],

        # char(4) - Lower-middle character
        [ 0b11111,
          0b11111,
          0b00111,
          0b00111,
          0b00110,
          0b00100,
          0b00000,
          0b00000 ],

        # char(5) - Lower-right character
        [ 0b11000,
          0b10000,
          0b00000,
          0b00000,
          0b00000,
          0b00000,
          0b00000,
          0b00000 ],
]

mylcd.lcd_load_custom_chars(fontdata1)

mylcd.lcd_write(0x80)
mylcd.lcd_write_char(0)
mylcd.lcd_write_char(1)
mylcd.lcd_write_char(2)

mylcd.lcd_write(0xC0)
mylcd.lcd_write_char(3)
mylcd.lcd_write_char(4)
mylcd.lcd_write_char(5)
'Raspberry Pi' 카테고리의 다른 글
| 라즈베리 파이 백업하기 (0) | 2020.10.20 |
|---|---|
| 라즈베리파이 웹캠 설치하기 / opencv 설치 (1) | 2020.10.19 |
| 라즈베리파이3) 초음파 센서를 이용하여 거리 출력하기(LED로 거리 색깔 조절) (0) | 2020.10.16 |
| 라즈베리파이3) 스위치 누르면 RGB LED색깔 바꾸기 (0) | 2020.10.16 |
| 라즈베리파이 본격수업 2일차 (오전) (0) | 2020.10.16 |