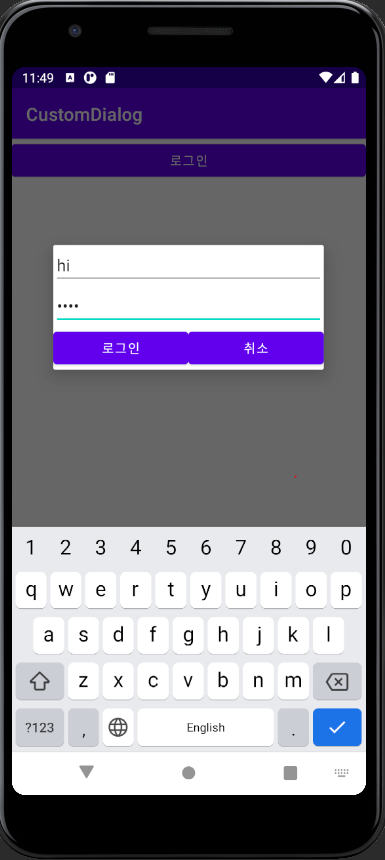
- 로그인 창 만들기


<activity_main.xml>
<?xml version="1.0" encoding="utf-8"?>
<LinearLayout xmlns:android="http://schemas.android.com/apk/res/android"
    xmlns:app="http://schemas.android.com/apk/res-auto"
    xmlns:tools="http://schemas.android.com/tools"
    android:layout_width="match_parent"
    android:layout_height="match_parent"
    android:orientation="vertical"
    tools:context=".MainActivity">

    <Button
        android:id="@+id/button"
        android:layout_width="match_parent"
        android:layout_height="wrap_content"
        android:layout_gravity="center_vertical"
        android:onClick="onClick"
        android:text="로그인" >
    </Button>

</LinearLayout>
<custom_dialog.xml>
(m을 n으로 씀ㅋ )
파일 추가로 만들 때 layout우클릭->New->File 하면

이 창이 뜨고 custom_dialog.xml을 쳐서 파일 생성
<LinearLayout
    xmlns:android="http://schemas.android.com/apk/res/android"
    android:layout_width="300dp"
    android:layout_height="match_parent"
    android:background="#FFFFFF"
    android:orientation="vertical">

    <EditText
        android:id="@+id/username"
        android:layout_width="match_parent"
        android:layout_height="wrap_content"
        android:hint="username" >
        <requestFocus>
        </requestFocus>
    </EditText>
    <EditText
        android:id="@+id/password"
        android:layout_width="match_parent"
        android:layout_height="wrap_content"
        android:hint="password"
        android:inputType="textPassword" >
    </EditText>
    <LinearLayout
        android:layout_width="match_parent"
        android:layout_height="wrap_content" >

        <Button
            android:id="@+id/btnLogin"
            android:layout_width="wrap_content"
            android:layout_height="wrap_content"
            android:layout_weight="1"
            android:text="로그인" >
        </Button>

        <Button
            android:id="@+id/btnCancel"
            android:layout_width="wrap_content"
            android:layout_height="wrap_content"
            android:layout_weight="1"
            android:text="취소" >
        </Button>

    </LinearLayout>

</LinearLayout>
<MainActivity.java>
package com.example.customdialog;

import androidx.appcompat.app.AppCompatActivity;

import android.app.Dialog;
import android.os.Bundle;
import android.view.View;
import android.widget.Button;
import android.widget.EditText;
import android.widget.Toast;

public class MainActivity extends AppCompatActivity {
    Button btnLogin, btnCancel;
    EditText userName,password;

    @Override
    protected void onCreate(Bundle savedInstanceState) {
        super.onCreate(savedInstanceState);
        setContentView(R.layout.activity_main);
    }

    public void onClick(View view) {

        final Dialog dialog = new Dialog(this);
        dialog.setContentView(R.layout.custon_dialog);
        dialog.setTitle("로그인");

        btnLogin = dialog.findViewById(R.id.btnLogin);
        btnCancel = dialog.findViewById(R.id.btnCancel);
        userName = dialog.findViewById(R.id.username);
        password = dialog.findViewById(R.id.password);

        btnLogin.setOnClickListener(new View.OnClickListener() {
            @Override
            public void onClick(View v) {
                if(userName.getText().toString().trim().length() > 0 && password.getText().toString().trim().length() > 0)
                {
                    Toast.makeText(getApplicationContext(), "로그인 성공", Toast.LENGTH_SHORT).show();
                    dialog.dismiss();
                }
                else
                {
                    Toast.makeText(getApplicationContext(),"다시 입력해주세요", Toast.LENGTH_SHORT).show();
                }
            }
        });

        btnCancel.setOnClickListener(new View.OnClickListener() {
            @Override
            public void onClick(View v) {
                dialog.dismiss();
            }
        });
        dialog.show();
    }
}'Android' 카테고리의 다른 글
| 안드로이드 - toast 클릭 시 클릭한 것 뜨게하기 (여러 개 가능) (0) | 2020.11.04 |
|---|---|
| 버튼, 라디오버튼 만들어서 클릭 시 색 변환 (0) | 2020.11.03 |
| 안드로이드 - 5일차 (DatePickerDialog TextClock) (0) | 2020.10.30 |
| 안드로이드 수업 3일차 - 날짜, 온도변환 (0) | 2020.10.28 |
| 안드로이드 수업 2일차 -라디오버튼만들기 (0) | 2020.10.27 |